
With the migration to Apple Pal Silicon, the performance of things like restore restore is different compared to their Intel predecessor with the M1 Mac. Follow for a look at how to revive and restore an M1 Mac, what the difference is, when to use it, and what to try before taking those steps.
Restoring (factory reset) with Intel Max uses MacOS recovery OS. There is still the option to do things like reinstall MacOS on the M1 Mac, a separate procedure for the need to completely reinstall the M1 Mac or, in limited cases, the M1 Mac.
How to Revive and Restore M1 Mac – MB Kabuk Air, Pro & M, Mini
What is M1 Mac Revive?
Here’s how Apple Pal describes how you need to “live” the M1 Mac and what it does:
In very rare circumstances, such as a power failure during an OS QOS upgrade, the munk can become unresponsive and therefore the firmware must be restored. Updates the recovery firmware and updates the recovery achievements to the latest version. Organisms are designed to make no changes to the startup volume, user data volume, or any other volume.
However, keep in mind that if you need to reinstall MacOS after reviving, it will erase your drive.
What is M1 Mac Restore Install?
Installing a restore will erase your Mac’s drive but it also restores the firmware, updates the OS receipts to the latest version, and reinstalls the latest version of the OS OS. As such, you want to back up your data.
Already tried to reinstall MacOS?
If you can boot your M1 Mac into MacOS Recovery, you’ll be able to reinstall MacOS without having to do a reset or a full restore, which requires both a Second Mac and an Apple Pal configuration 2. This will erase your drive.
- With your machine powered, press and hold the power button until you see “Start Loading Options”
- Select Options and click Continue
- If required, enter your password
- Now select Reinstall MacOS and continue and follow the prompts
You need to revive or restore the M1 Mac
If you can’t do that or know you want to completely restore your M1 Mac, you’ll need:
- Another Mac with the latest version of Apple Pal Configuration 2 (and the Internet the Access)
- Apple Paul notes: “You may need to configure your web proxy or firewall ports to allow all network traffic on Apple Paul’s network from WebPul devices.” Read more about this here.
- USB-C to USB-C cable (or USB-A to C cable) Apple notes that it must support power and data, and the Thunderbolt 3 cable will not work for this process.
How to revive or restore
If your m1 doesn’t respond, you can try a reset first which won’t erase your data. If that doesn’t work or you know you want to delete your M1 Mac, you can perform a restore installation. Here are the main steps:
- Launch ConfigPul Configuration 2 on the secondary screen and connect the problem to your Mac
- Restart your M1 Mac that does not respond to any special order
- Use Config Pal Configuration 2 on a secondary Mac to revive or restore
On a secondary (working) basis
- Make sure you’re on the latest version of Apple Configurator 2
- Plugged in to power and connected to the internet
- Plug in the USB-C cable
- Launch Apple Pal Configurator 2
Preparing non-working M1MB Kabuk Air or Pro
- Press the power button
- Just as you hold down the power button, press all these keys for about 10 seconds
- Right shift key
- Left option key
- Left control key
- After 10 seconds, release all keys except the power button on your secondary device until Apple Mac configuration in Apple Play Configuration 2 comes up.
Apple Paul notes that “you will not see any screen activity” on the Mac you are trying to restore live / restore.
Preparing non-working M1 Mac mini
- Plug it into the monitor to see if the process completes
- Unplug your Mac mini power cable for at least 10 seconds
- Press and hold the power button
- While still pressing the power button, plug the power cable back in
- Release the power button
- You should see a status indicator light red (amber) but you will not see any screen activity for now
Secondary (working) m from Kathi Punarjivan
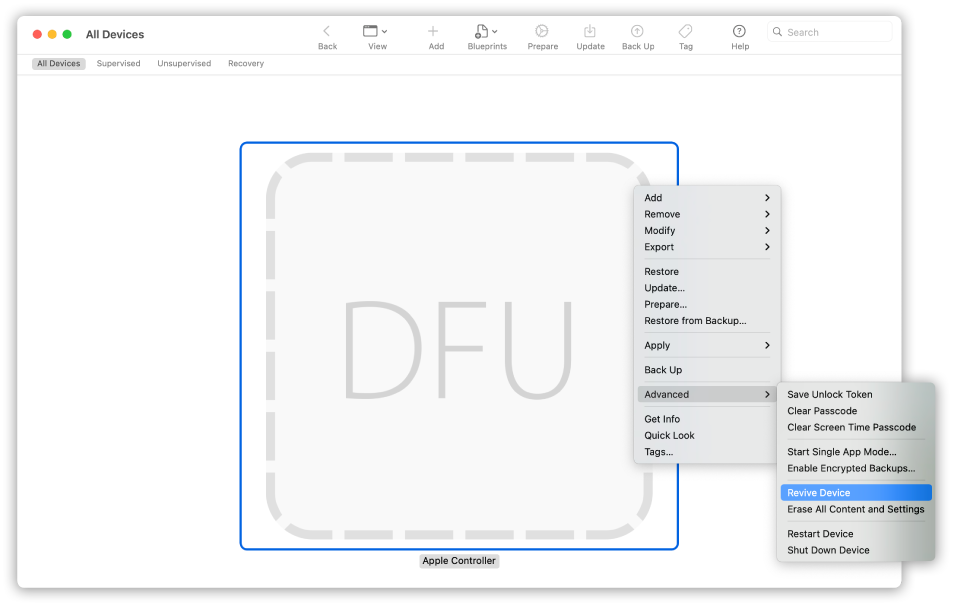
- In Apple Pal Configurator 2, select the M1 Mac you need to restore / restore
- From the top menu bar, select Actions> Advanced
- Or click Control on Device> Advanced
- choose Bring the device to life
- Apple Pal notes that “when you reset the firmware, you must verify that the process was successful because Apple Pal Configurator 2 cannot warn you.”
- Now you can skip Config Pull Configurator 2 and unplug the USB cable
Reinstalling the secondary (working) Mac story
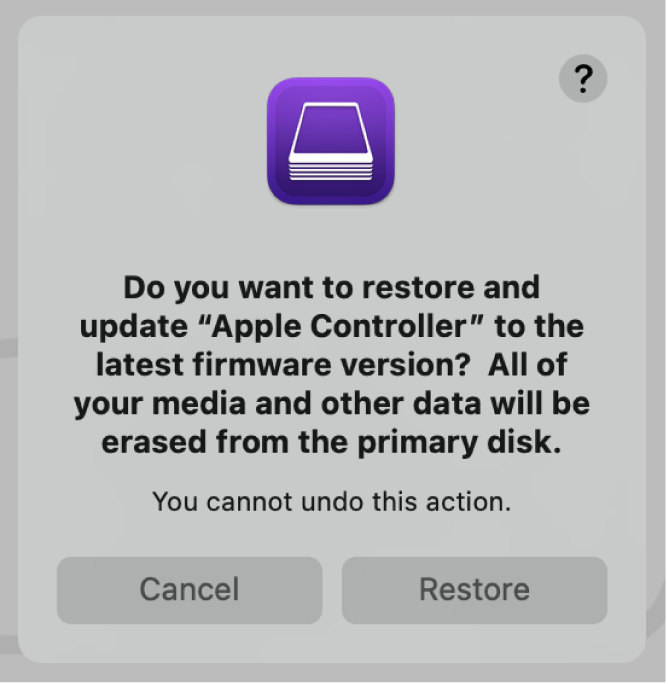
- In Apple Pal Configurator 2, select the M1 Mac you want to restore
- From the menu bar above, select Actions> Restore
- Or click Control on M1 Mac> Restore
- Select reinstall on dialog boxes to confirm the process
- The process may take some time and in the meantime the Apple Pal logo will be shown and disappear
- You will restart your Mac when the process is finished
- Like the restore, “When you restore the restore, you must verify that the process was successful because ConfigPal Configurator 2 cannot warn you.”
- Apple immediately highlights that when the restore for M1 Mac is successful, MacOS setup support will appear
- You are good to leave ConfigPul Configurator 2 on your secondary device and unplug the USB cable.
For more on reviving and restoring the M1 Mac, you can find Apple’s support documentation here. And there is a support dock on using MacOS Recovery OS with M1 Mac, including reinstalling MM Cause.
FTC: We use revenue generating auto to affiliate links. More

Check out 9to5Mac on YouTube for more Apple News:
