Google Cloud Print has been pushed to the sunset in just a few weeks since December 31, 2020. Many of you have seen the plastered notice at the top of your Chromebook’s printed dialog and reached out to ask us what your options are. In the new year. Google Cloud Print, or GCP, was created at a time when Google needed to act as an intermediary for the printing of Chromebook users because many printer manufacturers did not create drivers for Chrome OS due to its widespread lack of access. Since it has changed so drastically over the last few years, GCP is no longer necessary (though it will be missed), and most printers work with a minimal setup with a Chromebook.

Some important home care
I will start by saying clearly that if you are looking for a tutorial on how to move your business or school away from GCP, you should read our other tutorial. Also, If you are interested in an alternative solution that allows you to print over long distances without the limitations of your home Wi-Fi, which requires optional third-party services. That we will discuss in the near future.
Also, if you have an HP printer, you can just buy a USB Type-A to B cable from your local Best Buy (just ask for a printer cable) and plug it in to print! Other brands may work too, but in my experience, only HP does. This is by far the easiest way to print on your Chromebook, although the drawback is that your laptop will need to be tethered on the printer during the process.
Today, I’m going to walk you through another simple method – connecting your Chromebook to your home network and wireless printer using the “CUPS” method. For most Chromebook users, standard wireless printing with CUPS should be a systematic replacement for Google Cloud Print (GCP). The “CUPS” or Common Unix Print Service lets you set up advanced printing attributes, such as stapling, paper trays, and pin-code printing management, to print 1 or 2-sided pages in black and white or color. Basically, it’s the same one you’ve always used without understanding GCP.
To reduce confusion I am going to be very specific with today’s tutorial, so if you just want notes of discussion rocks, I would recommend Visual Simulator by Google’s excellent step by step partnership below. It was one of the many tools in my belt for my clients in the retail space as a Chromebook Expert and it has been done very well. If you are still having trouble following their steps, you can refer to this article for some important notes on the things you have faced in the last 3 years.
Start an interactive tutorial
Removing your GCP printer
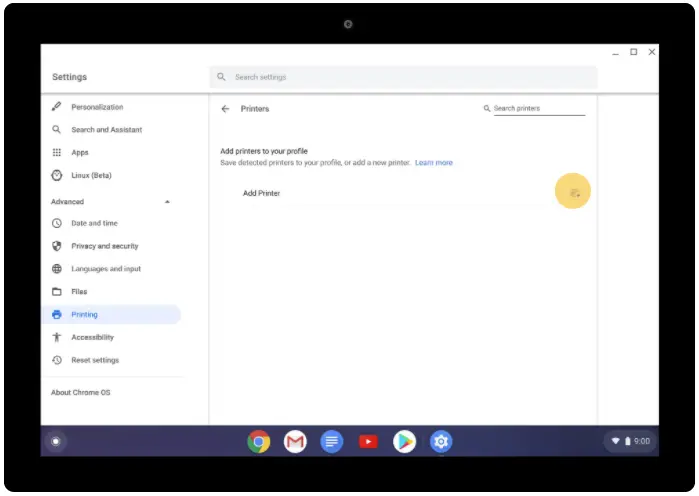
“Well, Michael, I don’t care if I use a CPS or a bowl to print, just tell me how to do it!” I hear you – let’s get started. To print to your Chromebook, you’ll need to visit the Printers section of the Settings app. To get there, all you need to do is tap your ‘everything button’ and search for it. Next – and this is very important – let’s remove your GCP printer from the list of printers available on your device. You may need to remove it from the Google Cloud Print web interface, but it should be sufficient to remove it locally. You don’t need it anymore (or you won’t be able to use it anytime soon), it reduces confusion later if we just remove it. Once you’re in the Settings app on your Chromebook, click in the search bar at the top and type ‘Printing’ to get there. If you see your existing printer listed, tap on the three dots next to it and then tap ‘Remove’.
Settings> Printing> Three dots> Remove (GCP printer if applicable)
Let’s get started
Okay, let’s connect your printer to Wi-Fi instead! Since you are already in the printer settings, tap the small icon to the right of ‘Add Printer’. A dialog box will pop up nearby called ‘Add a nearby printer’. As long as your printer and your Chromebook are connected to the same network, they should appear on this list. If it doesn’t appear, make sure both devices are on the same Wi-Fi and try again. If this works, congratulations! Your printer has successfully connected to your Chromebook. I recommend that you go to the ‘Changing your print target’ section of this article for an important tip. Otherwise, if you continue to have problems, we will connect them using your IP address instead.
Connect the printer and Chromebook to the same wireless network
Select Printers from Settings> Printing> Printer Icon> List
Your printer’s IP address is a unique identifier that allows your Chromebook to communicate with it. Think of it this way – unless you know someone’s name you’ll probably have a hard time addressing them directly. If you say ‘Hey, you!’ A lot of people can see, but if you say ‘Hey, Michael Perigo!’ Only then will I turn my head. That’s a silly but accurate analogy.
Looking for your printer’s IP address
To get your printer’s IP address, go to the small screen next to it, tap the cogwheel icon, scroll down to ‘Network’ or ‘Wireless’. Then, find ‘View Wireless Details’ or something else. I generalize because each company bury the address under a different verb. You can check with HP, Epson, Brother, Canon or any other manufacturer for step-by-step instructions through Google search. Once you find the IP address, it will be printed or you can write it down on a piece of paper (or just remember it) and go back to your Chromebook.
Okay, let’s get back on track. So you have tapped the printer icon and now a dialog box will be presented with the heading ‘Add Printer Manually’. Fill in all required fields – give your printer a name, enter the IP address you found (usually 192.168.xx where x’s printer displays a unique number for you), and then press the blue ‘add’ button at the bottom. Click OK. You can skip the protocol bx and queue.
On the next screen, select the brand and model of your printer. If your model is not listed, just find something close to it that you can do. This only determines if you later find some settings unique to your printer in the print preview window. Now, click the blue ‘Add’ button at the bottom and bottom again You’ve successfully added your printer!
Settings> Printing> Printer Icon> Enter Name> Enter IP Address> ‘Add’ Button
Select Printer Manufacturer> Select Printer Model> Add Button
Changing your print destination
Okay, listen – if you’re printing wireless for the first time on your Chromebook, you’ll probably notice that clicking CTRL + P on the document and sending a blue ‘save’ button to the bottom right of the print preview doesn’t work. It’s for your printer! This is very important and I have found that many people who have problems continue to do so because they have forgotten to change their printing location. To fix this, simply select the first dropdown labeled ‘Destination’ and rename it to your printer from ‘Save as PDF’. You will need to click ‘View more …’ and then select your printer from the Additional dialog box that appears.


If you follow all of the steps above, you should have a document printed from your printer with this reading – congratulations! I know it lasted a long time, but I think everything needed to be covered in detail. I hope this serves as your go-to guide for printing on Chromebooks, especially since Google Cloud Print disappeared later this year. If this was helpful, leave a comment and share this with someone you know who may need it. If anything needs to be improved for clarity, let us know! Happy printing!

