If you can not afford $ 1000 or more for a new machine, you can express a few more years with a storage upgrade for some older MacBook Air or MacBook Pro models. Here’s how to do it.
This year, schools are offering personal as well as virtual options. It does not matter what option your school offers, the best new computer may be a computer that is new to you.
Last year we bought a 2015 MacBook Air with 8 GB of RAM and 128 GB of storage. The problem is that 128GB is not large enough to meet the requirements of the school. They want 256GB or higher.
Upgrade MacBook Air
First you will need to assemble the computer and parts. We found the 2015 MacBook Air and a 2017 MacBook Air on Craigslist.
Both years are essentially the same computer, with a speed bull in CPU MHz. We could have found a MacBook Pro too, but it costs more and weighs more.
- 2015 as newer MacBook Air
- bootable macOS USB drive to reinstall macOS
- Sintech NVMe adapter
- Crucial P1 1TB drive
- P5obe screwdriver
- T5 torx screwdriver
Support the model
The Mac you are upgrading to does not have to be a MacBook Air. It can also be a MacBook Pro, like Mac mini.
Overall, every 2013 to 2017 MacBook Air, 2013 to 2015 MacBook Pro, and 2014 Mac mini can be upgraded, with good results. How can you tell if your computer is compatible with an upgrade? If you click About This Mac, System Report, the Hardware Overview section has a model identification number that you can use to determine compatibility.

MacBook Pro
- MacBook Pro (15-inch Retina display mids 2015) Model ID: MacBookPro11.5
- MacBook Pro (15-inch Retina display mids 2015) Model ID: MacBookPro11.4
- MacBook Pro (13-inch Retina display early 2015) Model ID: MacBookPro12.1
- MacBook Pro (15-inch Retina Display 2014) Model ID: MacBookPro11.3
- MacBook Pro (15-inch Retina Display 2014) Model ID: MacBookPro11.2
- MacBook Pro (13-inch Retina Display 2014) Model ID: MacBookPro11.1
- MacBook Pro (15-inch Retina Display 2013) Model ID: MacBookPro11.3
- MacBook Pro (15-inch Retina Display 2013) Model ID: MacBookPro11.2
- MacBook Pro (13-inch Retina Display 2013) Model ID: MacBookPro11.1
MacBook Air
- MacBook Air (13-inch mids 2017) Model ID: MacBookAir7,2
- MacBook Air (13-inch early 2015) Model ID: MacBookAir7,2
- MacBook Air (11-inch early 2015) Model ID: MacBookAir7.1
- MacBook Air (13-inch early 2014) Model ID: MacBookAir6.2
- MacBook Air (11-inch early 2014) Model ID: MacBookAir6.1
- MacBook Air (13-inch mids 2013) Model ID: MacBookAir6.2
- MacBook Air (11-inch mids 2013) Model ID: MacBookAir6.1
Mac mini
- Mac mini (let 2014) Model ID: Macmini7.1
The problem with Standby
As we write, “with good results,” there is a caveat. 2013-2014 machines treat hibernation differently than 2015 and later machines.
Apple has various power management modes to increase battery life. One of these could be a problem for users upgrading to an NVMe drive in a 2013-2014 machine.
Some of these machines will panic if you try to go into standby mode. Standby is where the computer records a snapshot of the current state of your computer to the flash drive, normally after about 3 hours. A Mac on Standby can stay on account for up to 30 days without plugging in.
The solution is to prevent the computer from going into Standby. Here’s how to do it.
- Open the Terminal app
- Type sudo pmset -a standby 0
- Press Return
- Opposite the terminal
The computer will still hibernate or sleep without storing the current state of the computer on the flash drive. You will still have battery life, although maybe not the kind of battery life of 30 days without charging.
2015 and later machines do not need any adjustments like this at all.
Support OS
You can run a range of macOS with these NVMe disks:
- Hege Sierra
- Mojave
- Catalina
- Big Sur (probably)
For the students in our house, we go with Mojave. Any app they will use will work well with Mojave, but your mileage may vary.
At some point in the future, we’ll probably upgrade the machines to Big Sur, but not until it’s out for a few point versions.
Support support
There are a range of disks available that will work, but unless the Mac has a controller that can take advantage of faster speeds, there is no more advantage to spending on a faster disk.

While the WD Black SN750 can transfer speeds at an estimated 3400 MB / s, it is not convenient if the Mac cannot support those speeds.
The Samsung disks have a history of working after Firmware updates have been applied. The problem with firmware updates is that they require a Windows machine to install them. If you are preparing a computer for a student, this may be beyond your comfort level.
The Crucial P1 drives are affordable (1TB for $ 104) where every other terabyte drive was more money.
Our advice: buy the drive that is within budget and will meet the needs of your Macintosh and your school’s recommendations.
What you can do to maximize things:
We considered what the machines we had were capable of, and made them out based on that.
For example, you can get a 4TB drive. It will be expensive. Practically, we set up 1TB or less.
For a MacBook Air, the maximum controller speeds are between 700 and 1500 MB / s. The Retina 15 “MacBook Pro Mid-2015 supports 4x lane PCIe 3.0 speed, and can support 3000 MB / s.

The upgraded MacBook Air
For our MacBook Airs, the Crucial P1 makes sense. If we upgrade a 2015 Retina MacBook Pro 15 “, the WD Black might make more sense.
Even though we knew the slower Crucial drive, it achieved 1476 MB / s read and 1323 MB / s write speeds on the MacBook Air. On our stock MacBook Pro 2015 we get only 529 MB / s read, 482 MB / s write speeds.

The original drive in a 2014 MacBook Pro
It is worth noting that simply because a drive is rated at a high speed, it is possible to achieve less than that speed. For example, we tried the WD Black drive in a computer running Windows, and it reached 2900 MB / s. On macOS on the same computer it reached 2400 MB / s.
There are many variables, and while we do what is not officially supported, it is still an impressive speed increase across stock exchanges.
Okay, you convinced me. How was it done?

Shut down the computer. Use the Pentalobe P5 to remove the bottom cover of the MacBook. Not all screws are the same length, and it is important to get each back into the same hole where it came from.

keep the screws in order
You may take cardboard and pack the screws in the cardboard in orientations equal to the screw holes from which they came out. Or you can place strips with double-sided tape down and organize on that. Whatever you do, make sure the screws go into the holes where they came from when you are ready.
The coverage will come off easily. On the MacBook Air, we lift around a corner or hinge area to work around the edges. There is a kind of bracket at the middle of the sides of the machine, where you can feel the cover and lift off.

Remove the original drive
Locate the SSD. In the center of the MacBook Air is a Torx screw that holds the button. Unscrew it and remove the drive, set it aside.
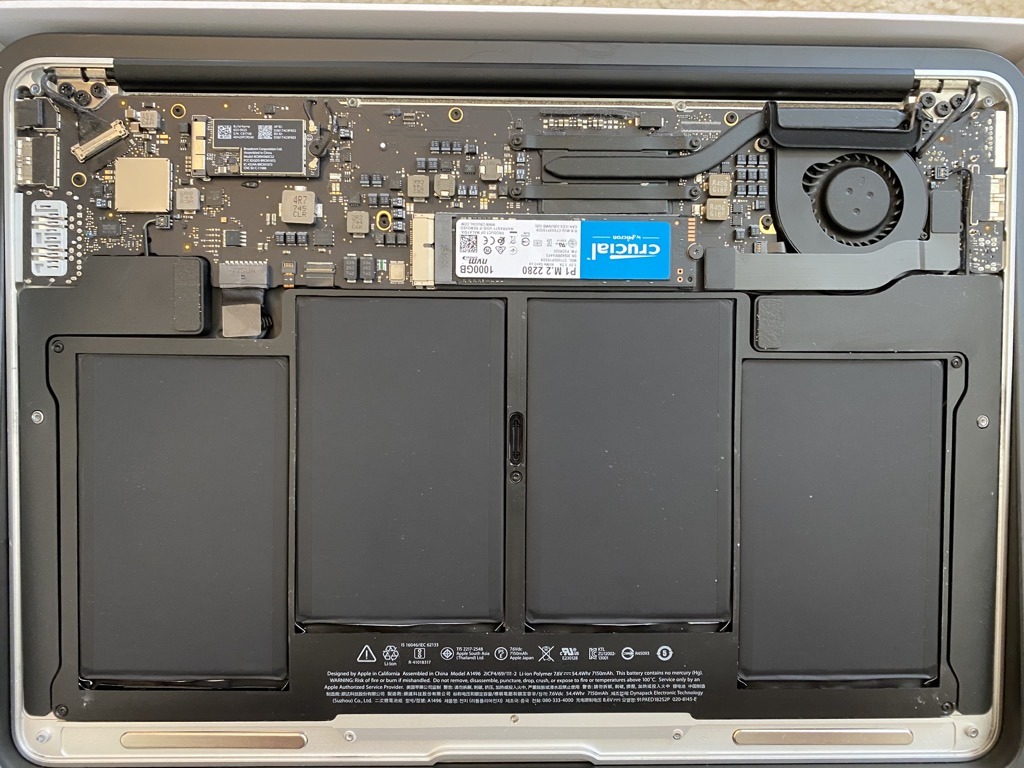
Take the Sintech NGFF to M.2 NVMe adapter, and insert it in place of the original drive. Then take the new NVMe drive and insert it into the adapter. When everything is tuned, the notch at the end of the NVMe drive will line up with the post where the Torx screw came from. You can reuse it, or use the Philips screw that came with the adapter.

Insert the adapter
Make sure you unplug the adapter and drive correctly on the standoff where the Torx screw goes into. This may require some care to insert the adapter and ride completely into its sleeves.
Replace the computer cover, making sure to replace the screws in the holes where they came from. Normally on Macs, the longest screws go near the hinge area, or near the center of that hinge edge.

Install the new drive and adapter
Insert the USB macOS drive you created earlier. Switch on while holding down the Option key. Select the USB drive when the list of drives appears. The computer will recover after recovery.
Open Disk Utility to format the new SSD drive as GUID partition scheme with macOS journaled file system. Once done, stop Disk Utility and proceed with installing macOS.

Reinstall MacOS
The result will be a faster computer than stock configuration, more storage, and the drive will appear in System Report under NVMExpress.

System report showing success
Express some life from those storage-restricted MacBook Air and MacBook Pro models
We bought a MacBook Air for 2015 for $ 280 and a 2017 MacBook Air for $ 420. Craigslist is subject to availability and haggling, and your willingness to meet strangers who wear face masks with large sums of money.
There’s a lot of life left in second hand Macs, and upgrading one from a few years ago is an affordable way to meet or exceed computer requirements for back-to-school. The computer will be faster, have more storage, on a budget.
.
