
Comet C / 2020 F3 (NEOWISE) has hit the night sky here in the northern hemisphere, delighting observers and photographers alike. With planning, patience, and clear skies, you can capture an unforgettable image of this heavenly event.
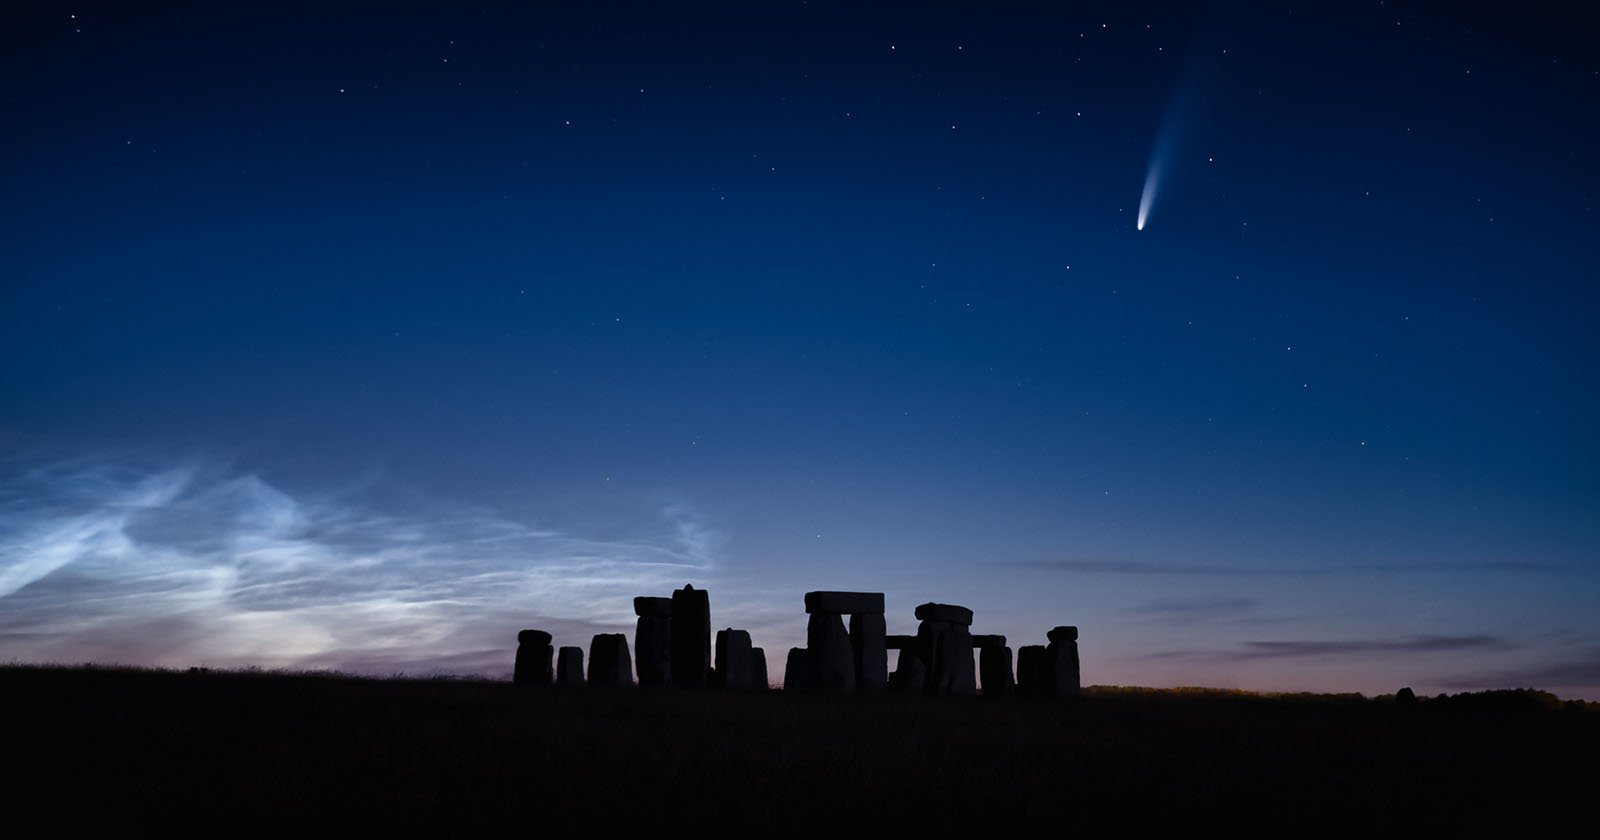
In the early hours of Saturday, July 11, I captured an image of Stonehenge with the comet glowing overhead and arguably the most spectacular display of the year with noctilucent clouds dancing behind. I posted the image online later that morning and went to bed for a few hours. I woke up to hundreds of comments, direct messages, and emails from photo fans who wanted to know where, when, and how to photograph the comet for themselves.
I hope this article answers those questions for anyone else hoping to capture this rare astronomical gift.
“Stonehenge, England” above was filmed with a Nikon D850 and Tamron 70-200mm f / 2.8 to 102mm – f / 2.8 – 2 seconds – ISO 1250. 6 x stacked frames with Starry Landscape Stacker; light harvest
Where and when
NEOWISE appears in the N-NW night sky. Ambient light in the sky after sunset can be hard to find at first, so here is a tip for locating the comet with the naked eye: Try to blur your eyes and scan the sky quickly, it helps you see the faint glow of the tail .
If it is still too weak to see with the naked eye, you can try searching for it with a quick lens. I took a wide-angle photo looking north with my Sigma 14mm f / 1.8 and quickly located the comet’s tail 10-15 minutes before I could easily see it using just my eyes.
No one knows for sure how long NEOWISE will be visible at night. Theoretically, the comet should be visible in the northwestern night sky later in July, but this is not guaranteed, so shoot while you can!
Equipment
As essential as the camera itself is a tripod sturdy enough to support the weight of your gear and keep it still for up to 30 seconds (depending on how wide you shoot). A lightweight or travel tripod is a good idea if you’re hiking somewhere, but it may not work as well for long periods or if it’s windy.
Shoot with a fast, premium lens if you can; This will work best since a wide aperture allows you to capture more light and a more detailed image.
The comet’s tail covers a larger area than meets the eye: you may be forgiven for believing you would need a zoom lens. Actually, you can also achieve pleasing results with wider angles.
If you don’t already have one, a nifty fifty (a 50mm lens) tends to be an inexpensive option that provides a nice focal length to capture the comet with exposure times of up to 10 seconds.
Finally, consider a remote shutter, either wired or wireless. You can choose one of these inexpensively on eBay instead of using your camera manufacturer’s brand model. When you press the shutter button on your camera, it introduces a bit of movement that can interfere with your images. A remote shutter eliminates this. Alternatively, check to see if your camera has a built-in timer. For example, on my Nikon D850, I can safely shoot using the camera shutter when I set my timer to 5 seconds.
Here is an idea of what the comet will look like at various focal lengths.
35mm

Stonehenge, England. Nikon D850, Tamron 24-70mm f / 2.8, 35mm – f / 2.8 – 10 seconds – ISO 200. Single shot; no cultivation
On a full-frame camera, you should be able to shoot up to 14 seconds without any star trails.
50mm

Tenby, Wales. Nikon D850, Tamron 24-70mm f / 2.8, 50mm – f / 2.8 – 6 seconds – ISO 800. Single shot; no cultivation
On a full-frame camera, you should be able to shoot for 10 seconds without any star trails.
200mm

Dryslwyn Castle, Wales. Nikon D850, Tamron 70-200mm f / 2.8, 200mm – f / 2.8 – 2 seconds – ISO 1600. Single shot; cut
In a full-frame camera, you will only be able to shoot for 2 seconds before star tracking occurs. This means you would need a wide aperture and high ISO for a well exposed shot
Recommended apps and websites
Stellarium

Stellarium is a free open source planetarium for your computer, there is also a web version. You can enter your location and Stellarium can show you what the sky will look like at any time. Click NEOWISE and Stellarium will show you the azimuth (direction) and altitude for a given time.
Clear out
![]()
![]()
Clear Outside is a weather app for astronomers that offers a detailed breakdown of the cloud layer. It is free to use online or as an app for iOS and Android. Ideally, you want totally clear skies, but remember that the comet can still be seen through the cracks in the clouds, particularly wispy, high-level clouds.
The photographer’s ephemeris

Photographer’s Ephemeris is an extraordinary planning tool available as a paid iOS and Android app, and free to use on the web; registration is required. With this tool, you can plot your viewing location, an object you want to shoot, and TPE will tell you the direction and altitude. Combine this with Stellarium to find out where NEOWISE is in the sky and how this will work with the object you want to shoot.
PhotoHound

Finally, PhotoHound is a useful tool for finding remarkable photo locations around the world, and I’m not just saying this because I’m one of its co-founders! The web version is free to use; registration is required. Browse places of interest and see if they can be combined with NEOWISE to create an attractive image. (And when you do, you can add it to the PhotoHound map.)
Composition ideas
Now that you have located NEOWISE in the sky, you must decide how to shoot it. You can isolate the comet against the night sky or look for an interesting interest in the foreground. Here are some ideas for you to try.
Capture the comet and the landscape.

Llanllwni, Wales. Nikon D850, Sigma 14mm f / 1.8, 14mm – f / 1.8 – 20sec – ISO 800. Single shot; no cultivation
This is the easiest way to shoot, with a wider lens and illustrating a beautiful starlit landscape.
Consider photographing from higher ground to give you a nice perspective of the skies above and the land below in one frame. This also gives you the advantage of avoiding low-level fog and mist that can form in lower terrain at night.
Photograph the comet with an object or landmark

Glastonbury Tor, England. Nikon D850, Tamron 70-200mm f / 2.8, 200mm – f / 2.8 – 2 seconds – ISO 1600. 9 x stacked frames with Starry Landscape Stacker; cut
Find a landmark, building, or other notable object and photograph it next to the comet! You will need a combination of the above applications to find a suitable angle and time, but when they work in your favor, you are sure to produce a pleasing image for the public!
Isolate the comet

Nikon D850, Sigma 150-600 mm, 300 mm – f / 5 – 1 sec – ISO 2000. 9 x stacked frames with Starry Landscape Stacker; cut
This is the most difficult thing to achieve as you will need a good zoom, and the longer your focal length, the shorter your exposure will be to avoid star drag.
If you want to create exposures longer than this, you will need to use a star tracker. This is a fairly advanced technique, well beyond the scope of this beginner’s guide! An easier alternative is to capture multiple short exposures at high ISO and stack these frames using software like Sequator or Starry Landscape Stacker to reduce noise.
The 500 rule
If you are not sure how long to expose, you should check something called the 500 Rule which is used to calculate the longest exposure time you can achieve before stars become blurry.
The formula is as follows:
500 ÷ (crop factor x focal length) = shutter speed
That can be a little difficult to understand when you shoot the stars at 2 in the morning, so here is a table with common focal lengths.

I hope this article helps you capture this incredible exhibit in the coming days, capturing a memento of this historic occasion for years to come. Astrophotography requires patience and technical skill, but the results are worth it. I love seeing photos of NEOWISE, as well as capturing them for myself. You can tag me on social media so you can see your work.
About the Author: Mathew Browne is a South Wales photographer and co-founder of PhotoHound, an online community for photographers to share information on the world’s best photo locations. The opinions expressed in this article are solely those of the author. You can find more of Browne’s work on his website, Facebook, Instagram, Flickr and 500px. This article was also published here.
